Creating a DIY Monsters Inc scream canister is a fun and imaginative project that brings the magic of the beloved Pixar movie to life. Whether you're a fan of Sulley, Mike, or the entire Monsters Inc crew, this project allows you to craft a replica of the iconic scream canister that plays a pivotal role in the film. Not only is it a great way to showcase your creativity, but it also serves as an excellent prop for themed parties, Halloween costumes, or even as a unique home decor piece. With just a few materials and some dedication, you can build your very own scream canister that captures the essence of the movie.
For those unfamiliar with the concept, the scream canister is a fictional device used in Monsters Inc to collect and store the screams of children, which power the monster world. While the movie portrays it as a high-tech gadget, you can recreate it using simple household items and craft supplies. This project is perfect for kids, adults, and anyone who loves hands-on activities. By following this guide, you’ll learn how to design, assemble, and personalize your scream canister, ensuring it stands out as a one-of-a-kind creation.
In this article, we’ll walk you through every step of the process, from gathering materials to adding the finishing touches. Along the way, we’ll explore creative ideas to make your DIY Monsters Inc scream canister truly unique. Whether you’re a beginner or a seasoned DIY enthusiast, this guide is designed to be easy to follow while offering plenty of room for customization. So, let’s dive in and discover how you can bring this iconic piece of movie magic into your home!
Read also:Sarpinos Fort Lauderdale A Slice Of Authentic Italian Pizza In The Heart Of Florida
Table of Contents
- What Is a Scream Canister and Why Is It Iconic?
- What Materials Do You Need for Your DIY Monsters Inc Scream Canister?
- Step-by-Step Guide to Building Your Scream Canister
- How Can You Customize Your DIY Monsters Inc Scream Canister?
- Are There Any Safety Tips to Keep in Mind?
- What Are Some Creative Uses for Your Scream Canister?
- What Are the Most Common Mistakes to Avoid?
- Frequently Asked Questions About DIY Monsters Inc Scream Canisters
What Is a Scream Canister and Why Is It Iconic?
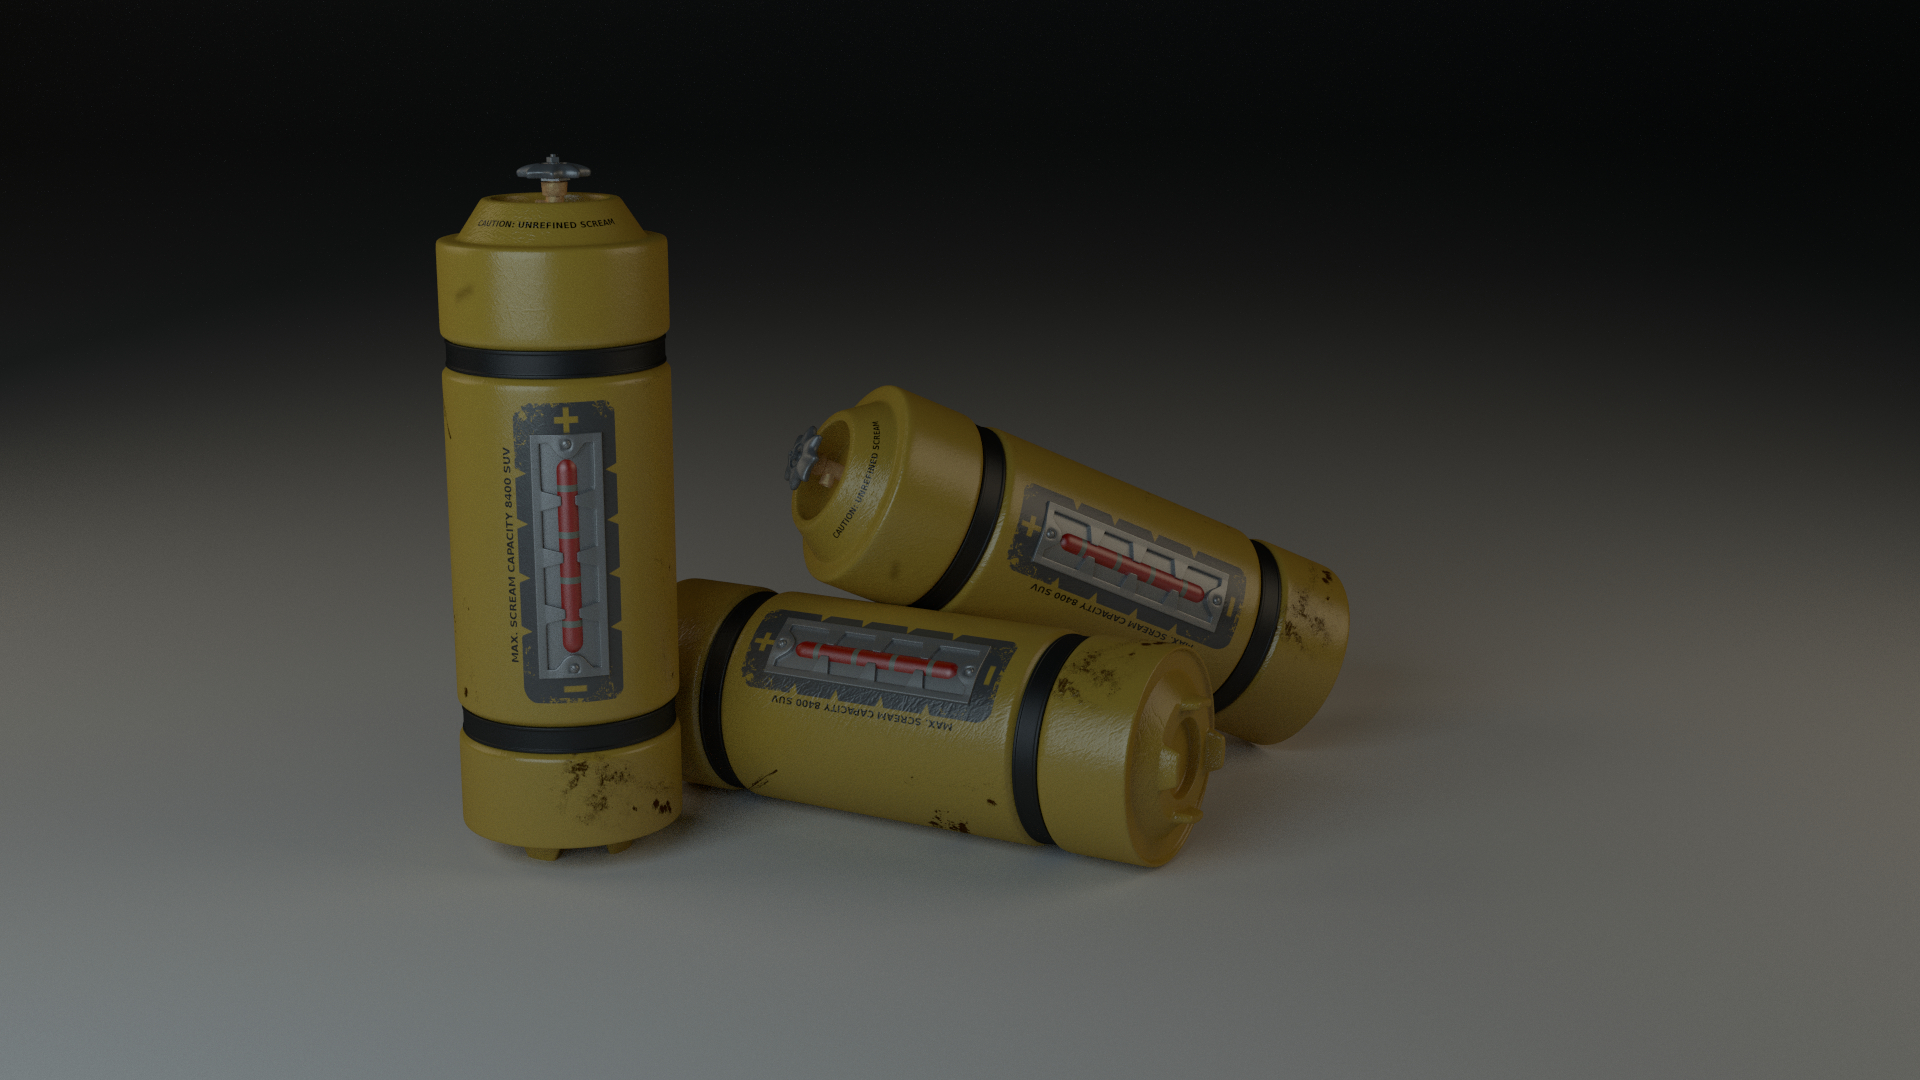
The scream canister is a central element in the world of Monsters Inc, serving as the primary means of collecting and storing energy for the monster city of Monstropolis. In the movie, these canisters are depicted as sleek, metallic containers with glowing labels and intricate designs, symbolizing the industrial and technological aspects of the monster world. The canisters are not just functional devices; they also represent the core theme of the movie: the power of laughter and imagination.
For fans of the franchise, the scream canister has become an iconic symbol of creativity and innovation. Its design is instantly recognizable, making it a popular choice for DIY projects, cosplay, and fan art. The canister’s sleek, futuristic appearance, combined with its playful purpose, makes it a perfect project for those looking to channel their inner artist. By recreating this iconic prop, you’re not just building a craft; you’re paying homage to a beloved piece of cinematic history.
Understanding the significance of the scream canister adds an extra layer of depth to your DIY project. It’s not just about replicating the look of the canister but also about capturing the spirit of the movie. Whether you’re crafting it for fun, as a gift, or as part of a larger project, knowing the backstory of the scream canister will inspire you to create something truly special.
What Materials Do You Need for Your DIY Monsters Inc Scream Canister?
Before you begin assembling your DIY Monsters Inc scream canister, it’s essential to gather all the necessary materials. Having everything ready will make the process smoother and more enjoyable. Here’s a comprehensive list of items you’ll need:
Main Components
- Empty Coffee Can or Pringles Tube: This will serve as the body of your scream canister. Choose a size that matches your vision for the project.
- Aluminum Foil: Used to create the metallic finish of the canister.
- Colored Paper or Cardstock: For creating labels and decorative elements.
- Glue or Mod Podge: To secure the foil and paper in place.
Tools and Accessories
- Scissors or Craft Knife: For cutting paper and foil.
- Paintbrush: To apply glue or paint evenly.
- Markers or Pens: For adding intricate details to the labels.
- LED Lights (Optional): To add a glowing effect to your canister.
Optional Add-Ons
- Stickers or Decals: For extra decoration.
- Hot Glue Gun: For attaching heavier components.
- Clear Acrylic Spray: To give your canister a polished, finished look.
Once you’ve gathered these materials, you’ll be ready to move on to the next step: assembling your DIY Monsters Inc scream canister. Each item plays a crucial role in bringing your project to life, so take the time to choose high-quality supplies that align with your creative vision.
Step-by-Step Guide to Building Your Scream Canister
Now that you have all your materials ready, it’s time to dive into the process of building your DIY Monsters Inc scream canister. Follow these detailed steps to create a masterpiece that captures the essence of the iconic prop.
Read also:Kim Jones Husband A Closer Look At The Life And Career Of The Fashion Icons Partner
Step 1: Prepare the Base
Start by cleaning your chosen container—whether it’s a coffee can or a Pringles tube—to ensure it’s free of any labels or residue. Once clean, wrap the entire surface with aluminum foil. Use glue or Mod Podge to secure the foil in place, smoothing out any wrinkles as you go. This step creates the metallic, futuristic look that’s characteristic of the scream canister.
Step 2: Design the Labels
Using colored paper or cardstock, design the labels for your canister. You can either replicate the labels from the movie or create your own unique designs. Use markers or pens to add text, symbols, or patterns. Once your labels are ready, attach them to the canister using glue. Be sure to position them carefully for a professional finish.
Step 3: Add Decorative Elements
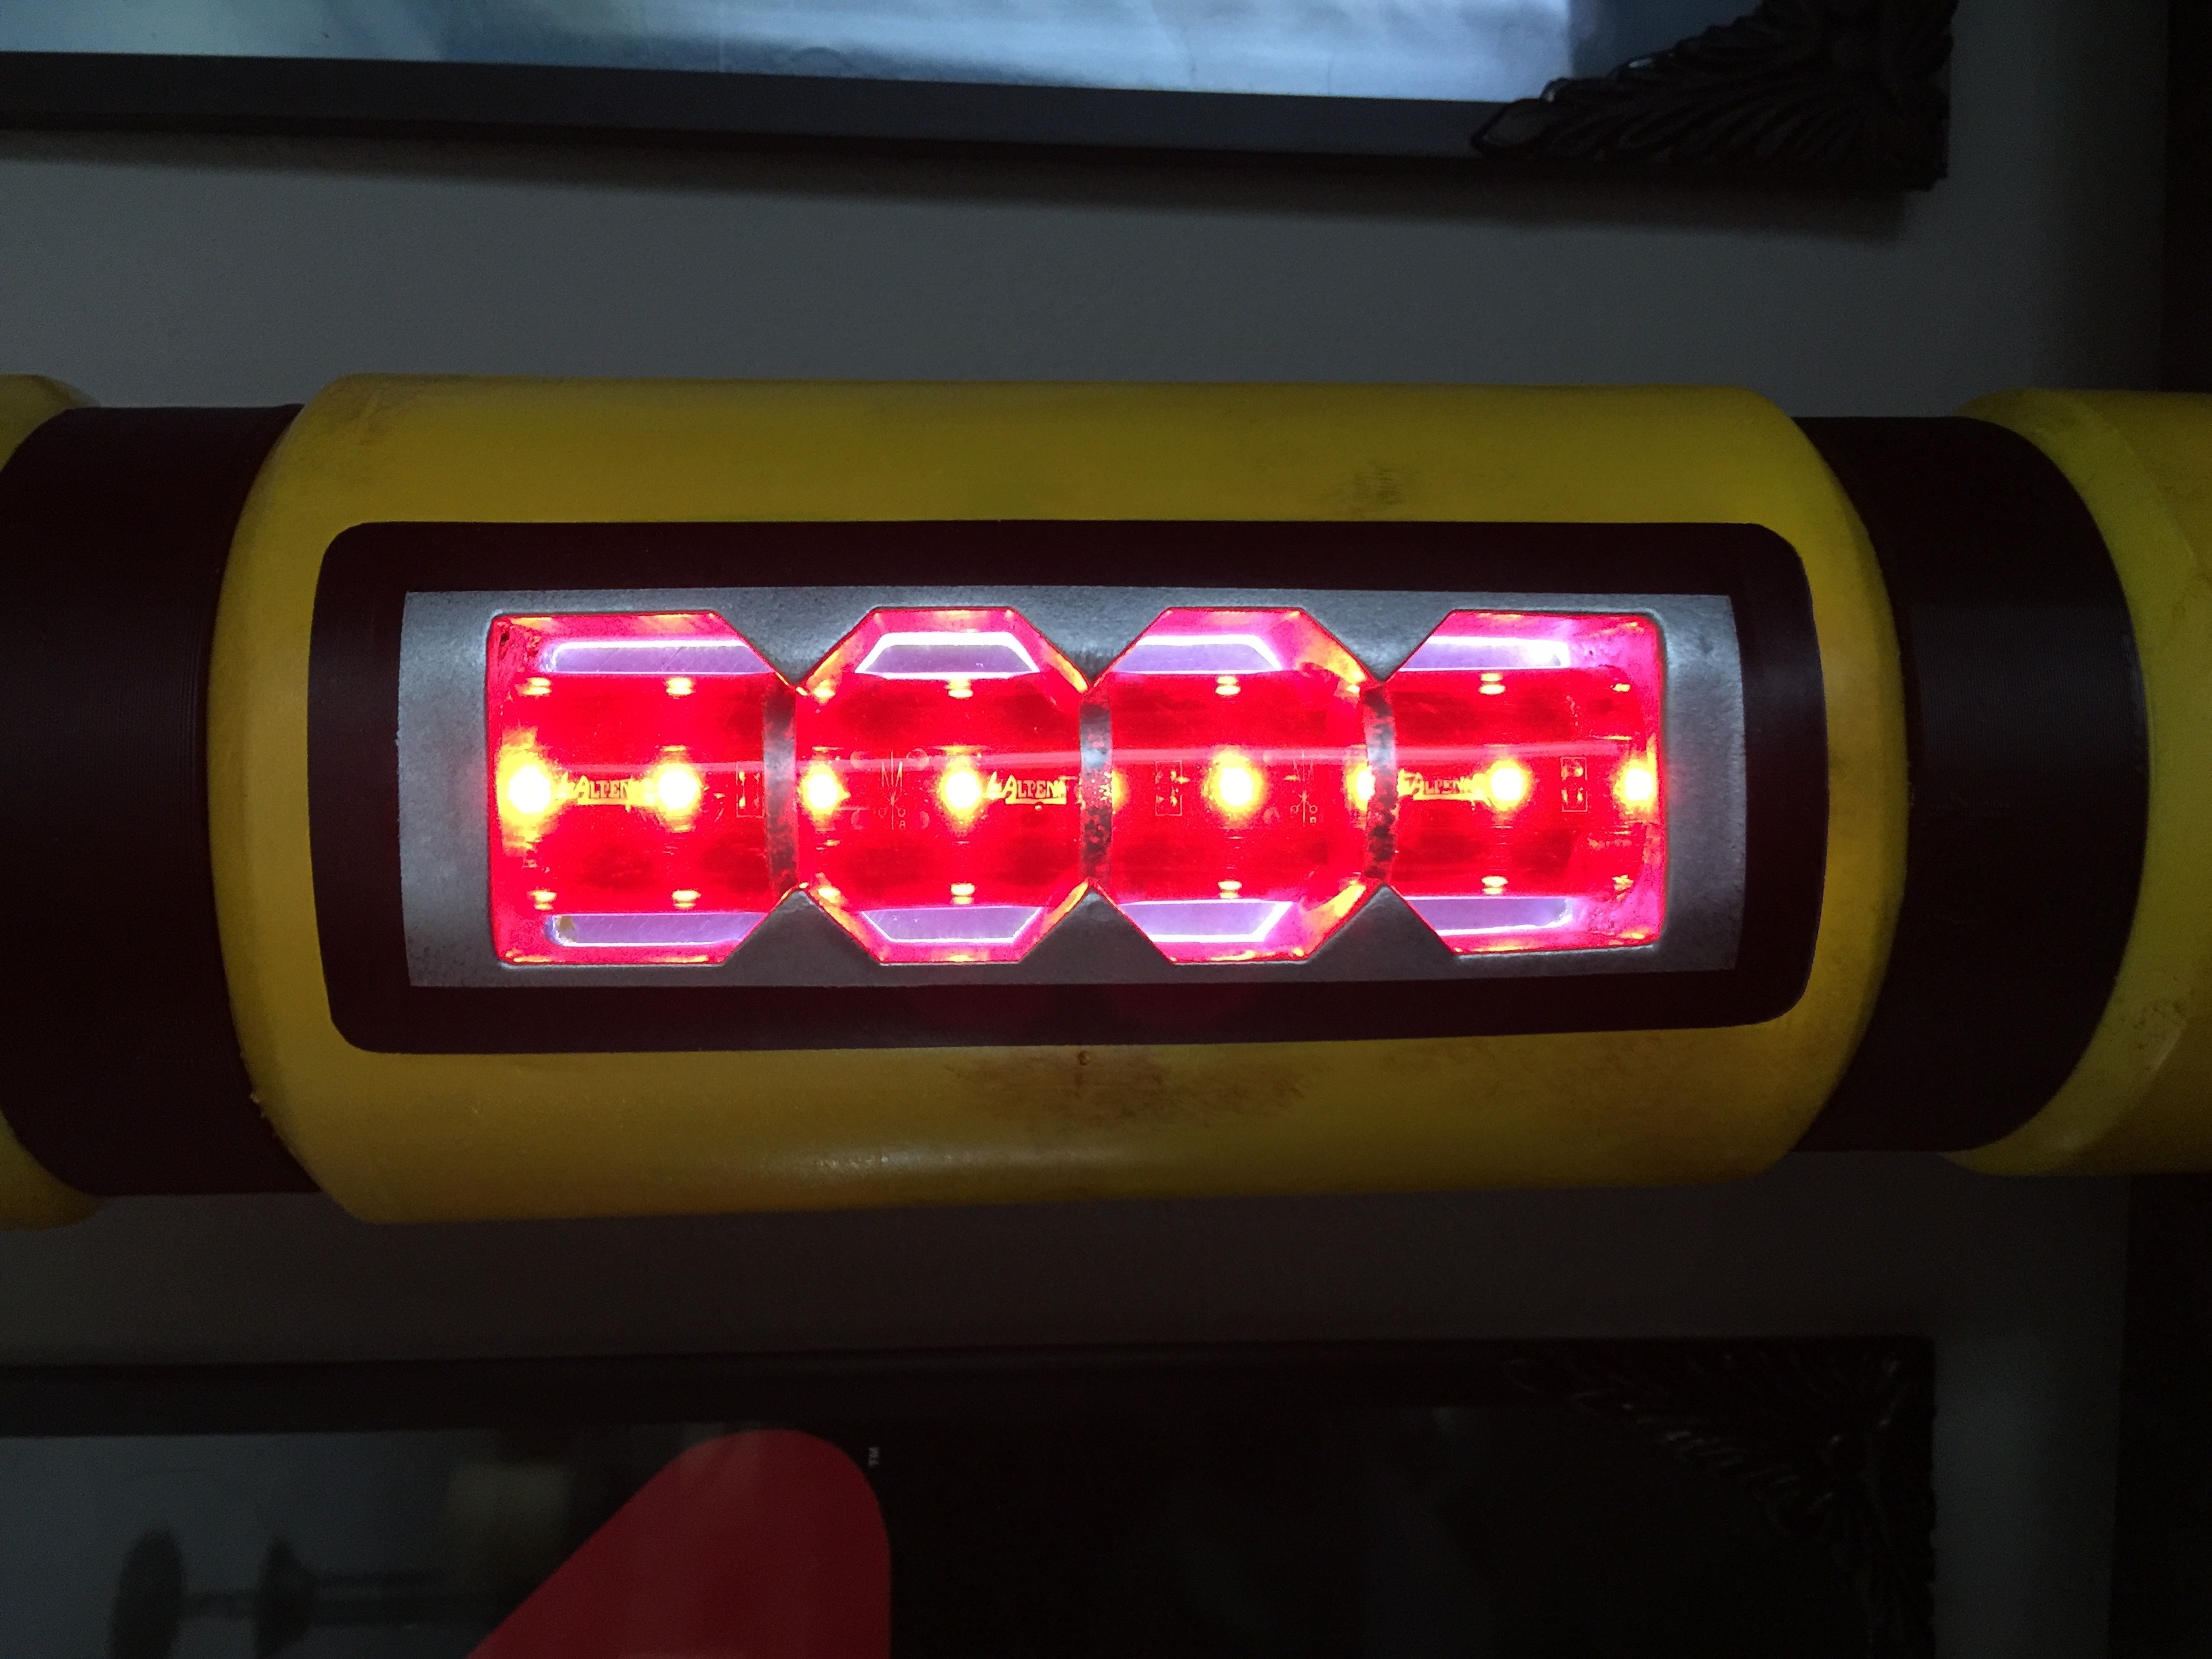
Enhance your canister with additional decorative elements, such as stickers, decals, or even small LED lights. If you’re using LED lights, place them inside the container to create a glowing effect. This step is where you can let your creativity shine, adding personal touches that make your scream canister truly one-of-a-kind.
Step 4: Seal and Finish
Once you’re satisfied with the design, apply a layer of clear acrylic spray to seal everything in place. This not only protects your work but also gives the canister a polished, professional appearance. Allow it to dry completely before handling.
Step 5: Final Touches
Inspect your canister for any areas that may need additional attention. Add any final details, such as extra foil accents or decorative tape, to complete the look. Your DIY Monsters Inc scream canister is now ready to be displayed or used in your next creative project!
How Can You Customize Your DIY Monsters Inc Scream Canister?
One of the most exciting aspects of creating a DIY Monsters Inc scream canister is the opportunity to personalize it. Whether you’re crafting it for a specific theme or simply want to make it stand out, there are countless ways to customize your project.
Theme-Based Customizations
- Character-Inspired Designs: Incorporate elements from your favorite Monsters Inc characters, such as Sulley’s fur texture or Mike’s eye pattern.
- Holiday Themes: Add festive touches, like Christmas lights or Halloween motifs, to match the season.
Interactive Features
- Sound Effects: Attach a small sound module that plays a scream or laugh when the canister is opened.
- Light-Up Effects: Use LED lights to create a glowing label or interior, mimicking the movie’s high-tech vibe.
Unique Finishes
- Textured Surfaces: Experiment with different materials, such as fabric or beads, to create a tactile finish.
- Custom Labels: Write your own messages or draw unique symbols to make the canister truly personal.
Are There Any Safety Tips to Keep in Mind?
While creating your DIY Monsters Inc scream canister is a fun and rewarding project, it’s important to prioritize safety throughout the process. Here are some key tips to keep in mind:
Handling Tools
- Always use scissors or craft knives with caution, especially if children are involved.
- Keep hot glue guns and other heat-based tools away from flammable materials.
Material Safety
- Ensure that any paints, glues, or sprays you use are non-toxic and safe for indoor use.
- Ventilate your workspace when using acrylic sprays or adhesives to avoid inhaling fumes.
Supervision
- If children are helping with the project, supervise them closely to prevent accidents.
- Encourage the use of protective gear, such as gloves or safety glasses, when necessary.
By following these safety tips, you can ensure that your DIY project is not only creative but also safe and enjoyable for everyone involved.
What Are Some Creative Uses for Your Scream Canister?
Once you’ve completed your DIY Monsters Inc scream canister, you may be wondering how to put it to good use. Here are some creative ideas to inspire you:
Home Decor
- Use the canister as a unique vase for artificial flowers or decorative branches.
- Display it on a shelf as part of a Monsters Inc-themed collection.
Party Props
- Incorporate it into a Monsters Inc-themed party as a centerpiece or photo prop.
- Use it as a candy holder or gift container for party favors.
Educational Tool
- Teach kids about recycling by showing how everyday items can be transformed into art.
- Use it as a storytelling prop to engage children in imaginative play.
What Are the Most Common Mistakes to Avoid?
Even the most experienced DIY enthusiasts can make mistakes when crafting a scream canister. Here are some common pitfalls to watch out for:
Poor Material Choices
- Using low-quality foil or paper that doesn’t adhere well can ruin the finish.
- Skipping the sealing step may result in a less durable final product.
Lack of Planning
- Failing to measure labels or decorative elements beforehand can lead to uneven designs.
- Rushing through the process may cause you to overlook important details.
Ignoring Safety
- Not using protective gear when handling sharp tools or chemicals can lead to injuries.
- Working in a poorly ventilated area may expose you to harmful fumes.
By being aware of these common mistakes, you can avoid them and ensure a smooth, successful crafting experience.
Frequently Asked Questions About DIY Monsters Inc Scream Canisters
How Long Does It Take to Make a DIY Monsters Inc Scream Canister?
The time required to complete your