Building your own bookcase is an incredibly rewarding project that not only enhances your home decor but also provides a sense of accomplishment. Whether you're looking to organize your growing book collection or simply add a stylish piece of furniture to your living space, a DIY bookcase is a perfect solution. With the right tools, materials, and a bit of patience, you can create a custom bookcase tailored to your needs and preferences. Not only does this project save money compared to buying a pre-made bookcase, but it also allows you to unleash your creativity. From choosing the wood type to deciding on the design, every step of the process gives you complete control over the final product. Plus, building your own bookcase is an excellent way to develop new skills and gain confidence in your DIY abilities.
If you've ever wondered how to build your own bookcase, this guide is designed to walk you through the entire process, from planning and preparation to assembly and finishing touches. Whether you're a beginner or an experienced DIY enthusiast, this article will provide you with all the information you need to succeed. We’ll cover everything, including selecting the right materials, understanding measurements, and ensuring stability and durability. By the end of this guide, you’ll have a functional and aesthetically pleasing bookcase that reflects your personal style.
Building a bookcase may seem daunting at first, but with a clear plan and the right guidance, it becomes an enjoyable and manageable task. This article will delve into the tools you’ll need, step-by-step instructions, and tips for avoiding common pitfalls. Additionally, we’ll explore creative design ideas to inspire you and answer frequently asked questions to address any uncertainties. So, if you're ready to roll up your sleeves and embark on this fulfilling DIY journey, let’s dive in!
Read also:Unlocking Success What Makes The Million Dollar Club Waffle House So Special
Table of Contents
- Why Build Your Own Bookcase?
- How to Choose the Right Materials?
- What Tools Do You Need for Building a Bookcase?
- Step-by-Step Guide to Building Your Own Bookcase
- Creative Design Ideas for Your DIY Bookcase
- How to Ensure Stability and Durability?
- What Are Common Mistakes to Avoid When Building a Bookcase?
- FAQs About Building Your Own Bookcase
Why Build Your Own Bookcase?
Building your own bookcase offers numerous advantages that go beyond simply having a place to store your books. One of the most compelling reasons is the opportunity for complete customization. Unlike store-bought bookcases, which often come in standard sizes and designs, a DIY bookcase allows you to tailor every aspect to your specific needs. Whether you want a tall, narrow bookcase for a small corner or a wide, low shelf for a spacious living room, the possibilities are endless. You can also choose the type of wood, paint, or finish that best matches your home's decor, ensuring that your bookcase becomes a seamless addition to your space.
Another significant benefit of building your own bookcase is the cost savings. Pre-made bookcases, especially those made from high-quality materials, can be quite expensive. By sourcing your own materials and investing a bit of time, you can create a sturdy and stylish bookcase for a fraction of the cost. Additionally, this project is an excellent way to develop new skills. Even if you're new to woodworking, the process of building a bookcase will teach you valuable techniques such as measuring, cutting, sanding, and assembling. These skills can be applied to future DIY projects, making this a worthwhile investment of your time and effort.
Beyond practicality, building your own bookcase is a fulfilling and creative endeavor. There’s a unique sense of pride that comes from creating something with your own hands, especially when it serves a functional purpose in your home. This project also allows you to experiment with design ideas, such as adding decorative elements like crown molding or incorporating hidden compartments. Whether you’re building a simple, minimalist bookcase or a more elaborate piece, the process is sure to be both enjoyable and rewarding.
How to Choose the Right Materials?
Selecting the right materials is a crucial step when learning how to build your own bookcase. The type of wood or material you choose will not only affect the durability and stability of the bookcase but also its overall appearance. For beginners, softwoods like pine are an excellent choice because they are affordable, lightweight, and easy to work with. Pine has a natural grain that can be stained or painted to match your home decor, making it a versatile option. However, if you're looking for something more durable and high-end, hardwoods like oak, maple, or cherry are worth considering. These woods are heavier and more expensive but offer a richer finish and longer lifespan.
Besides wood, you might also explore alternative materials such as plywood or medium-density fiberboard (MDF). Plywood is a cost-effective option that provides a smooth surface, making it ideal for painting. MDF, on the other hand, is extremely dense and resistant to warping, which makes it a great choice for shelves that will bear a lot of weight. However, MDF is not as durable as solid wood and may not hold up well in humid environments. When choosing materials, it's essential to consider the weight of the books or items you plan to store, as well as the overall aesthetic you want to achieve. For instance, if you're aiming for a rustic look, reclaimed wood can add character and charm to your bookcase.
Finally, don’t forget about the finishing materials. Sandpaper, wood glue, nails, screws, and wood stain or paint are all essential for completing your project. Sanding the wood ensures a smooth surface, while wood glue and screws provide additional stability. If you’re painting your bookcase, opt for a primer to ensure even coverage and a durable finish. By carefully selecting your materials, you can create a bookcase that is not only functional but also a beautiful addition to your home.
Read also:Exploring The Life And Career Of Actor Michael C Hall A Deep Dive
What Tools Do You Need for Building a Bookcase?
Having the right tools is essential when figuring out how to build your own bookcase. The tools you’ll need depend on the complexity of your design and the materials you’ve chosen, but some basics are universal. A circular saw or table saw is indispensable for cutting wood to the correct dimensions. If you’re working with plywood or MDF, a jigsaw can be handy for making curved or intricate cuts. For precise measurements, a tape measure and a carpenter’s square are must-haves. These tools ensure that your cuts are accurate and your bookcase is properly aligned.
Once the pieces are cut, you’ll need tools for assembly. A power drill is essential for pre-drilling holes and driving screws, which helps prevent the wood from splitting. A hammer and nails can also be useful, especially for securing smaller pieces or adding decorative elements. Clamps are another invaluable tool, as they hold the pieces in place while you assemble them, ensuring a sturdy and even structure. If you’re planning to sand the wood, an electric sander will save you time and effort, though hand sanding with sandpaper can also get the job done if you’re working on a smaller project.
Finally, don’t overlook safety equipment. Safety goggles, gloves, and a dust mask are crucial for protecting yourself from sawdust and debris. A level is also important for ensuring that your bookcase is perfectly straight and stable once assembled. While it’s possible to build a bookcase with minimal tools, investing in quality equipment will make the process smoother and the final product more professional-looking. With the right tools in hand, you’ll be well-prepared to tackle this rewarding DIY project.
Step-by-Step Guide to Building Your Own Bookcase
Step 1: Planning and Measuring
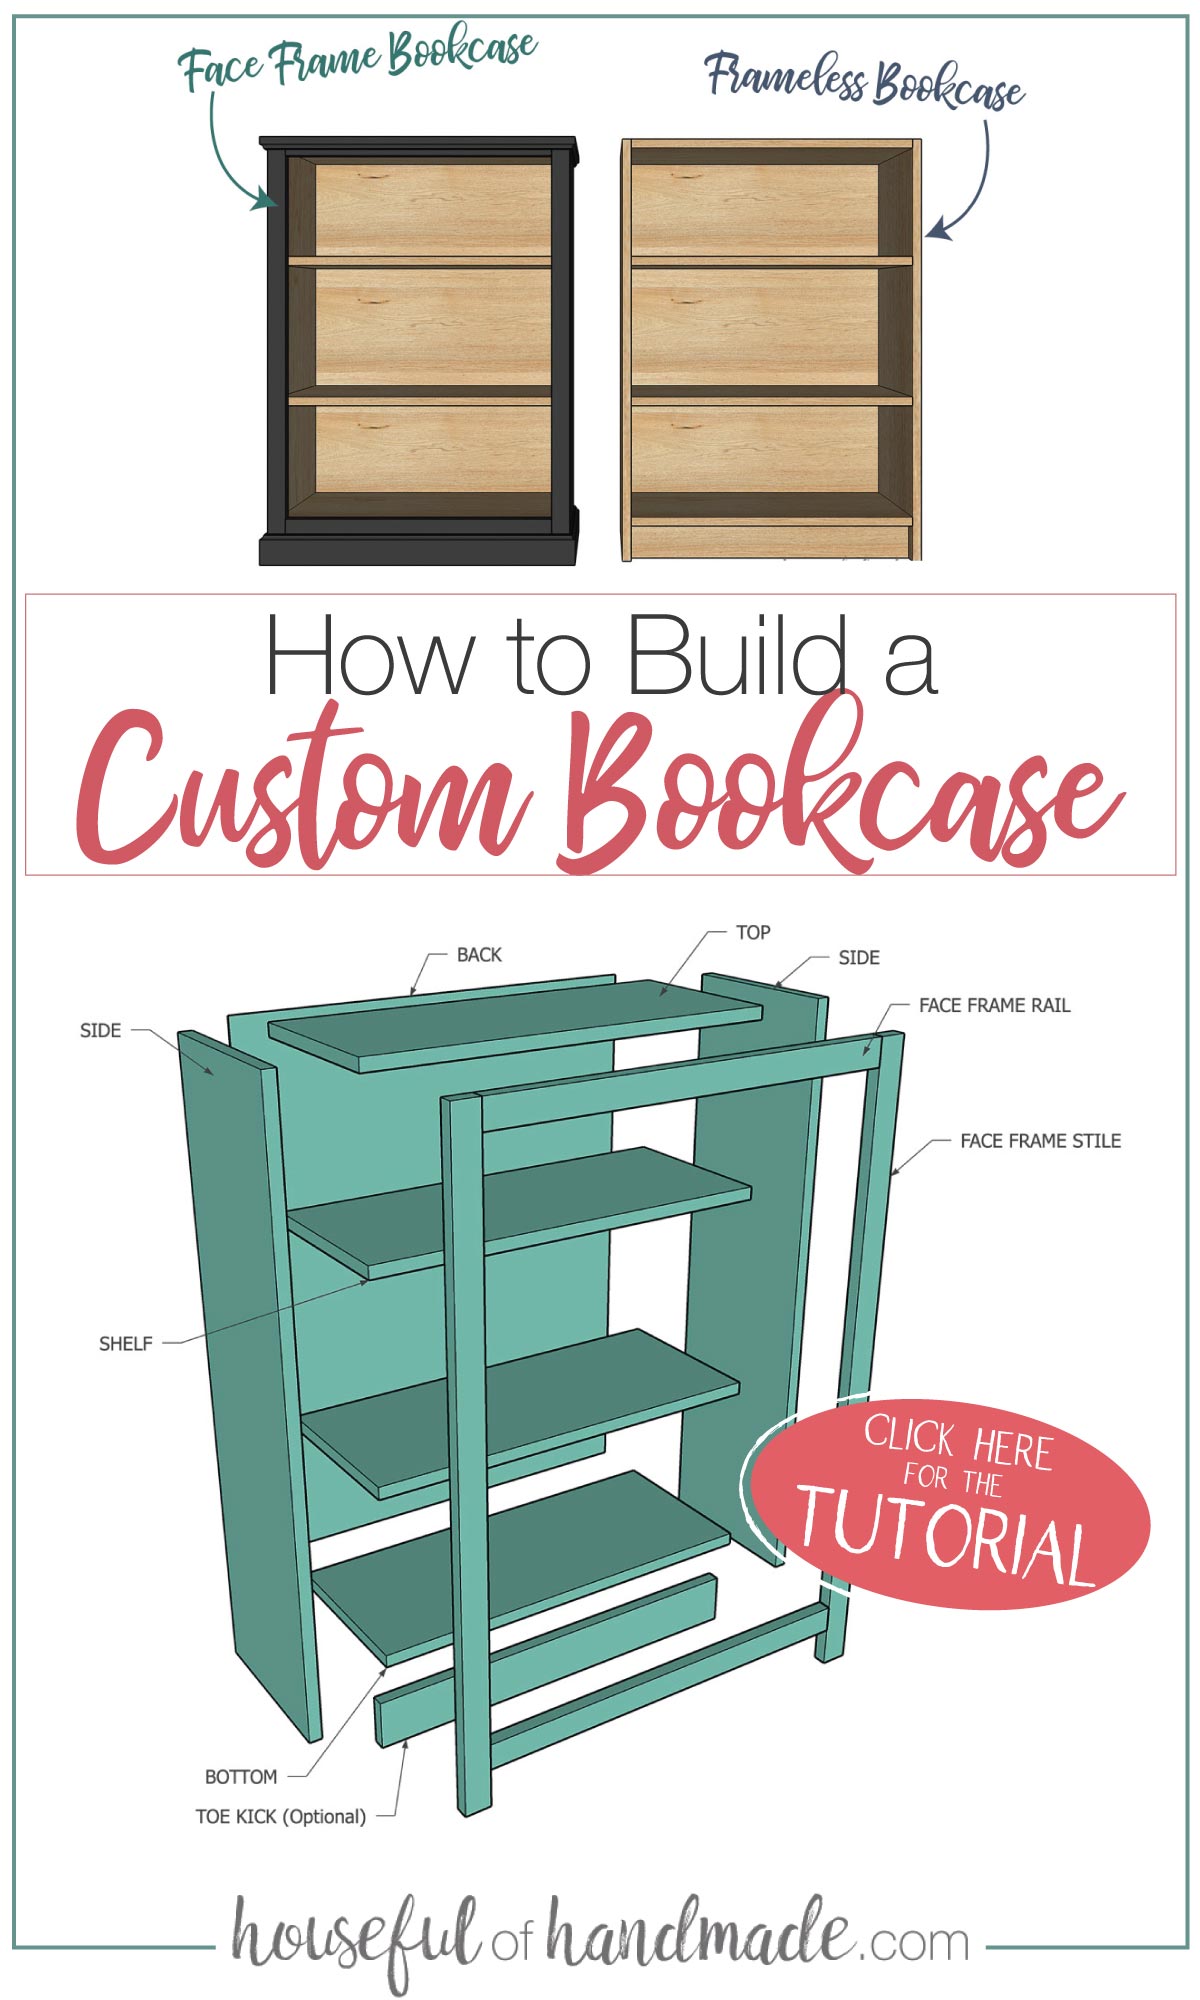
Before you begin cutting wood, it’s essential to have a clear plan for your bookcase. Start by deciding on the dimensions. Measure the space where you intend to place the bookcase, keeping in mind the height, width, and depth. A standard bookcase is about 12 inches deep, but you can adjust this based on the size of your books or other items you plan to store. Sketch a simple design on paper, labeling each piece—shelves, sides, top, and bottom. This will serve as your blueprint and help you calculate the amount of material you’ll need.
Once you have your design, double-check your measurements. Precision is key when learning how to build your own bookcase, as even small errors can lead to an unstable structure. Use a tape measure and carpenter’s square to ensure all your cuts will be straight and accurate. It’s also a good idea to label each piece of wood as you cut it, so you know exactly where it fits in the assembly process. This step may seem tedious, but it will save you time and frustration later on.
Step 2: Cutting and Sanding
With your measurements in hand, it’s time to cut the wood. If you’re using a circular saw or table saw, make sure to secure the wood firmly to prevent it from shifting during cutting. Take your time and follow the measurements carefully. Once all the pieces are cut, use sandpaper or an electric sander to smooth the edges and surfaces. Sanding not only improves the appearance of the wood but also prevents splinters and makes it easier to apply paint or stain later.
After sanding, wipe down the pieces with a damp cloth to remove any dust or debris. This step is crucial for ensuring a clean finish. If you’re using screws or nails for assembly, now is a good time to pre-drill holes in the wood. Pre-drilling prevents the wood from splitting and makes the assembly process smoother. With all the pieces prepared, you’re ready to move on to the next step.
Step 3: Assembling the Frame
Begin by assembling the frame of the bookcase. Start with the two side panels and attach the top and bottom pieces using wood glue and screws. Use clamps to hold the pieces in place while you secure them. Once the frame is assembled, check it with a level to ensure it’s straight. If the frame is uneven, the entire bookcase will be unstable, so take the time to make adjustments as needed.
Next, attach the shelves. Space them evenly or customize the spacing based on your needs. For example, you might want shorter spaces for paperbacks and taller spaces for hardcovers or decorative items. Secure each shelf with screws or nails, reinforcing them with wood glue for added stability. As you work, periodically check the alignment with a level to ensure everything is straight. Once the shelves are in place, your bookcase is almost complete.
Step 4: Finishing Touches
The final step is adding the finishing touches to your bookcase. If you’re painting or staining the wood, apply a primer first to ensure even coverage. Once the primer is dry, apply your chosen paint or stain, using smooth, even strokes. Allow the finish to dry completely before handling the bookcase. For added durability, consider applying a clear sealant to protect the surface from scratches and wear.
After the finish is dry, inspect the bookcase for any rough edges or loose screws. Tighten any loose connections and sand down any rough spots. Finally, place the bookcase in its designated spot and load it with your books or decorative items. With these steps completed, you’ve successfully learned how to build your own bookcase and created a functional and stylish piece of furniture.
Creative Design Ideas for Your DIY Bookcase
How Can You Add Unique Features to Your Bookcase?
When building your own bookcase, the design possibilities are virtually limitless. One way to make your bookcase stand out is by incorporating unique features that reflect your personal style. For instance, adding crown molding to the top of the bookcase can give it a more polished and elegant look, perfect for a formal living room or study. Similarly, installing LED strip lights inside the shelves can create a warm and inviting ambiance, making it ideal for showcasing books or decorative items. These small additions can transform a basic bookcase into a stunning focal point in any room.
Another creative idea is to incorporate hidden compartments or secret drawers into your design. These can be used to store small, valuable items like jewelry or important documents. You can also experiment with asymmetrical shelving, where the shelves are staggered or arranged at different heights. This unconventional design not only adds visual interest but also provides flexibility for storing items of varying sizes. If you’re feeling adventurous, consider adding a built-in desk or seating area to your bookcase, turning it into a multifunctional piece of furniture.
Using Color and Texture for Visual Appeal
Color and texture are powerful tools for enhancing the aesthetic appeal of your bookcase. Instead of painting the entire bookcase a single color, try using